Saturday, September 15, 2018

Shredder is Now Pedal-Powered!


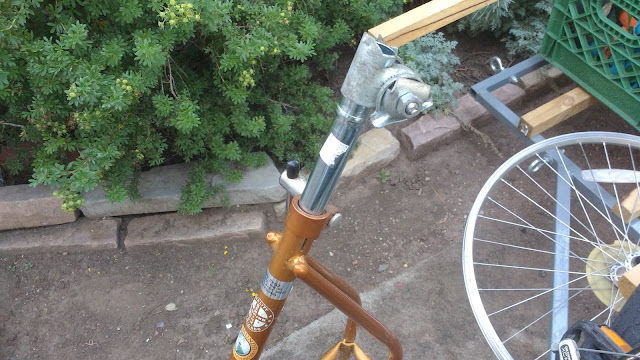
It's working! My fab guy mounted the shredder up and put some chain tensioners on it. It's working alright. The biggest issues right now are that the upper chain tensioner is spring mounted (was supposed to be solid mounted) and that the shredder is close enough that I really have to watch my knees. I slid the saddle back a little to reduce the risk of injury!

I can't shred much of anything until that tensioner is mounted solidly but I'll be bringing this to the farmer's market tomorrow to show it off. Some finishing touches will come this week, including a chain guard over that huge 65 tooth dinner plate chainring!

Tuesday, September 11, 2018

Shredder Drive System Almost Done!


I stopped into Bici Mundo yesterday to check up on the Schwinn Exerciser. Everyone there has been very helpful with this project. To recap, we are running a 28 tooth chainring at the crank straight forward to the big ring on a five speed freewheel. Then another chain will go from the 14 tooth cog on the freewheel straight up to a 65 tooth chainring on the shredder itself mounted near the 'dashboard'.

Thankfully, the five speed freewheel has been mounted on the wheel where only a single speed cog used to be! Susan had to move the axle over and re-dish the wheel to make it happen. Thankfully she was the one working so we got to work on it together.


Not much space in there! You can see a small nut down below it, near the dropout. That was hitting the cog teeth, so we had to remove it and the brace attached to it. Since I will be mounting the whole bike on a movable steel frame, I don't need the brace.


What I do need is a more supportive saddle, but Schwinn used a non-standard seat post diameter AND an old-style seat. Susan helped me pick out a seat post that will fit a modern-compatible seat clamp, and the seat clamp that will fit a modern mountain bike saddle which I'll try to get used for a song at another local shop that deals with a lot of new bikes. The original seat post will go to a tall friend who collects vintage Schwinns and needs the extra saddle height.


We fit a 28 tooth chainring to the one-piece crank and greased the bearings up nicely.


The flywheel weighs in at 10.89 pounds (4.94 kg). Lighter than I'd like, but still better than nothing.


We put the wheel back on and ran a 5-speed chain on it. Then we had to figure out a solution to stop the wheel. The bike came stock with a Weinmann center pull brake mounted on the backside of the fork. Setting that up as a hand brake (instead of the tensioner setup) would have meant running the cable straight through the frame tubes, so that wouldn't work. Susan picked out a used Tektro side-pull brake, which means the cable runs off the side of the brake, away from the frame. I grabbed a nice aluminum brake lever out of the other used bin. She even grabbed some used Jag Wire cable housing, meaning that almost nothing on this bike is new! A used machine is pretty cheap and very eco-friendly, being that very little material had to be mined, processed, and manufactured for this machine.


I'm going to have to mount a couple unsprung chain tensioners to deal with the extra long chains. I'll be mounting a used saddle to it, and the shredder will have to be mounted on a bracket to the 'dashboard' area. If I use a tensioner on the vertical chain to the shredder, I won't have to make the shredder position adjustable! But I'll probably have to figure out a different solution for the handlebars, since they and the stem might interfere with the shredder. It'll all come together...

Oven Wiring Part 1


Ward came over yesterday to show me how to wire this oven! Not only is he on my thesis committee (along with Diana Stuart and Peter Friederici, the chair), I am working with him on my independent study for semester for help with the machines. Above is the backside of the oven. For the purpose of the compression machine the left side in the photo will be the bottom, and the right side will become the top. That way the heating elements will not interfere with the mold compression or jack shaft going through the new bottom side. The oven came as 220V but we will be running it off 110V for the time being.

Tour of the oven. The top two isolated wires go to the broiler heating element. The elongated hole with two wires on the top right is the oven light. The galvanized (grey) piece on the bottom center guides the power cord (a used computer power cord) up to the connector (with white insulator behind it). The small grey box on the bottom right is a relay, and the new temp controller will be mounted near the front of the oven, out of sight.


The positive wire goes up through the power cord, and through that connector block and through the relay. From the relay it continues to the controller at the front of the oven, which makes sure turns the oven on and off repeatedly to maintain a consistent temperature. The wire then goes back through the relay and through the heating elements. The broiler elements are up top, while the standard heating elements are visible in the above photo above the connector block. The negative wires come off the other side and pass back through the power cord.

I really have no idea about wiring so this is a huge learning experience for me.

Here is the relay up close. We got it in a kit with a connector and thermostat sensor dealio. I'll post more photos as we hook them up. But it's coming along!

Friday, August 31, 2018

Shredder arrived!


Delivery! The shredder has arrived from Precious Plastic USA.

Here is roughly where it's supposed to go on the exercise bike. The 65 tooth chainring will go on the right side. But the challenge still exists of running two chains on the single speed, fixed gear flywheel. I have been working with a local bike shop, Bici Mundo, which deals with a lot of used and older bikes. One of the mechanics had the thought of attaching a 5-speed freewheel to my flywheel where there is only one cog currently. As I said earlier (link above) I'm looking to run a 28 tooth chainring on the exercise bike forward to a 28 tooth cog on the flywheel. Then another chain would run from a 14 tooth cog on the flywheel up to the 65 tooth on the shredder. Well, this 5-speed flywheel's smallest cog is a 14 and largest is a 28. So it should work, if there is enough room.

The usable width of any hub is referred to as the Over Locknut Dimension (OLD). The question is whether 5 cogs stacked next to each other will be too wide for this 120mm OLD frame. For reference, standard a mountain bike rear hub is 135mm. If nothing else, I could have the dropouts welded onto the frame with wider spacing, but this will be a last-ditch effort if necessary.


Gearing is one crucial thing to figure out but I will also need to mount this 30 pound shredder up on the front of the bike so it's operable by the rider. It also needs to be adjustable up and down to adjust chain tension. That all should be accomplished pretty easily with a bracket or two.

The hopper should arrive tomorrow and I am planning on displaying this at the Flagstaff Community Market this Sunday with the Azulita Project. If you are in Flagstaff, stop by to see it!

Wednesday, August 29, 2018

Oven Tear-Down

I decided to check the oven out tonight. It went pretty well but I should have dug out the 1/4" socket before starting!

The oven was purchased from the Flagstaff Habitat For Humanity Restore, which sells lots of great used household items and building materials. This oven was marked "tested" so I don't have to worry about whether it works. Since I don't need most parts of this for the recycling machine, it needed a bit of tearing down before building it back up.

I got the whole stove assembly off and also removed the controls.

Quite a few steel parts! Hopefully some will come in handy fabricating a control box later. The rest will get recycled.

Thankfully the oven already has fiberglass insulation on four sides- top, sides, and rear. That means I only have to add it to the bottom! Insulation is important not only because I don't want the outside of this getting too hot, but because keeping the heat in will allow it to get up to temp faster and run on less electricity.

The oven will probably be laid on its side for use as a plastic recycling machine. This allows the shaft above the jack to pass cleanly through the oven wall without interfering with the oven's built-in heating element.

Photo: Precious Plastic

Next up for the oven is to check in with my guru Ward Davis, with whom I am doing an independent study course this semester. He will show me how to hook up the controls, and I'll be able to get rid of most of the annoying and now-useless wires up top.

With the drawer removed, I found that the hinge and spring mechanism for the door are hidden below the oven itself. Therefore I may not want to chop everything off, as they essentially did in the prototype. I may use that open space for the control box, mold storage, or some other purpose.

Thanks for reading!

More Funding!

Great news everyone! Last Thursday I was invited to speak at the Flagstaff Sustainability Commission in defense of my grant proposal for an extrusion machine (aka extruder). I'm happy to say that I was awarded $2,000 to buy the extruder from Precious Plastic USA!


 Photo: Precious Plastic

The extruder takes plastic flakes of any combination of colors through the hopper and spits out a stream of plastic, like a big Play-Doh extruder. This allows me to produce consistently colored plastic for more professional-looking products. I will still be able to get the cool confetti look (below) but now can make solid colors as well, without worrying about collecting recycling material of the exact same color.

Some people have been experimenting with the extruder as a way to create filament for 3D printers as well. I am not planning to do this, as I would prefer to work on production-oriented solutions made from molds. I believe 3D printers are best suited to complex prototyping work which does not fit my project well.

Photo: Precious Plastic

In addition to that grant funding, bringing me to a total of $7,000 I just received another $500 from a family member who thought the project is cool! The result: A whopping total of $7,500 so far, $4,500 of which has been earmarked for machines alone.

And one more quick update: the shredder has been completed and is in the mail! Should be here by early next week. I'll be working with the local bike shop soon to figure out a way to modify that exercise bike to send a chain up to the shredder input. Then it's mostly bracket building for the shredder. I'm very excited!

Thursday, August 16, 2018

Human Powered Shredder Planning


Shredder stuff begins! As part of my NAU grant I have ordered a shredder mechanism from Precious Plastic USA in Portland, Oregon. While that is being built, though, I haven't been wasting time.

In order to save money and demonstrate the shredder in off-grid places like the Flagstaff farmer's market, I've decided to power it with muscles. I picked up this early 70's Schwinn Exerciser stationary bike and will modify it to power the shredder directly. The shredder will be mounted up on what might be called the dashboard so it can be operated by the person pedaling.

I will have to reduce the gearing substantially as well. A few people have created hand-crank shredders with 5:1 gearing- that is, for every five cranks of the hand, the shredder cranks over once. I will be using leg power instead; since legs are more powerful than arms I will be able to run the shredder faster and with greater force.

Technically, this will be a bit tricky but not ridiculous. The bike came stock with a 65T (the T stands for "tooth") chainring going to a 14T cog, spinning that flywheel up to a high speed. Instead, I plan to run a 28T ring from the cranks forward onto another 28T on the flywheel. I'll stack a 14-ish tooth cog next to that 28T and run it straight up to a 65T chainring (pictured) on the input shaft of the shredder. This will reverse the stock ratio, giving it about 4.6:1 gearing. If that turns out to be too easy to pedal, or if the shredder is turning too slowly, I will be able to easily pull out the crankset, change to a larger chainring, and shred at a higher speed.

Work on this will continue as soon as I can get that flywheel to the bike shop to figure out how to stack cogs. I will also write a post soon about my "compression machine" progress!

Introduction to Praxis Plastics

Hello!

In addition to my almost ten year old illustration business I am continually dreaming up new projects to complete. The latest one is also possibly the most complex and involved yet. As part of my master's thesis project in Sustainable Communities at Northern Arizona University, I am building a small plastic recycling workshop in my garage.

I am constructing a shredder and compression machine from Precious Plastic, a Dutch organization headed by Dave Hakkens, which offers open-source plans for four plastic recycling machines. These will be built off Version 3 plans.

After researching the process for building these I realized the cost is very high- $2000 or more for a turnkey shredder! This is partially because the machines are designed to be built from scratch on location anywhere in the world. While this is great for people with access to a machine shop, it does mean that those ordering these laser cut parts from a business end up paying a pretty penny.


What I am trying to do is reduce the cost of Precious Plastic machines by building as many steel shredder pieces as possible out of recycled plastic. This is to develop a more affordable shredder that will use fewer expensive virgin materials, instead transforming a former waste stream (used plastic) into a valuable product that will enable more people to recycle more plastic for less money. They will then be able to make their own products, bringing money and skill into their communities.

I received a generous $5000 grant from the NAU Center for Ecosystem Science and Society (ECOSS) that is funding the construction of my first two machines- a pedal-powered shredder and a compression machine. So far I have ordered a shredder from Precious Plastic USA in Portland, Oregon. I have purchased a used oven from Habitat for Humanity and have ordered controller parts for the oven. I have also sourced two free exercise bikes for the shredder mechanism and have diverted several used bed frames from the landfill, which will be transformed into cheap, zero-waste tables for these machines!

I call this project Praxis Plastics. This page of my website is dedicated to this thesis project and whatever comes out of it. I plan to document any work completed here to aid my memory, act as outreach, and to benefit of others who are embarking on similar projects. Please watch this space in the coming weeks and months!